Project 1: Hello, NodeBB!
Learning Goals
- Familiarize yourself with an existing software project
- Download, install and run an existing software project
- Onboard on development tools and technologies
- Learn Git Flow and GitHub to support future collaborative development
- Run local analysis tools and use the output to evaluate a codebase
Project Context
Welcome to the 17-313 development team! To get started, you will be going through our onboarding process to familiarize yourself with both the course and the project you will be working on. Eventually, you will be tasked with designing and developing new features, but the first step is to download, run, explore, and evaluate the existing software product.
This semester, we will be building upon NodeBB, an open-source community forum software project that was started in 2014. You can learn more about this project from the original development team's website.
For your own development, you will be forking your own repository off of a class-specific fork of NodeBB, which you can find at https://github.com/CMU-313/NodeBB.
Our fork contains some tweaks to make the project easier to modify and debug. This will also allow you to create issues and pull requests that are visible to the instructors, which will be the primary way of submitting code deliverables for this project.
Deliverables and Deadlines
This is an individual assignment. There are four (4) deliverables and one (1) deadline for this homework.
Onboarding – 100 points – due Thursday, January 26th, 11:59pm
- Build Checkpoint (5 pts)
- GitHub Issue (20 pts)
- GitHub Pull Request (35 pts)
- Gradescope Written Assignment (40 pts)
Prerequisites
Onboarding Materials
Before jumping into the codebase, please review the course syllabus and be sure you have access to each of the following:
- Course Slack - check your email for an invite link
- Canvas
- Gradescope
If you run into any trouble accessing the above or have any questions, reach out to the instructors.
Git & GitHub
In this project and throughout the rest of this course, you will be expected to work extensively with Git and GitHub. Specifically for this project, you should be familiar with:
- Forking/cloning GitHub repositories
- Understanding general Git flow - pulling, branching, adding, committing, pushing, merging
- Creating GitHub Issues and using related features (labels, assignees, milestones)
- Creating GitHub Pull Requests and using related features (linking to issues)
- Creating GitHub Project Boards
If you are not familiar with any of these steps, you are highly recommended to first complete a short Github Exercise, as it will cover the standards we are expecting in this class (which you will be graded upon). Refer to the Resources & Documentation section if needed.
Getting Started
Repository Setup
Fork the class-specific repository into your personal GitHub account.
Warning
Even though this project is based off of an active open source project, we have made significant changes to ensure its suitability for our class. As such, be sure you are forking off of CMU-313/NodeBB and direct any questions to course staff. Do not contact the maintainers of NodeBB for assistance with your homework questions.
Ensure that GitHub Actions are enabled (click the green button under the "Actions" tab), then follow the below installation instructions based on your computer's operating system:
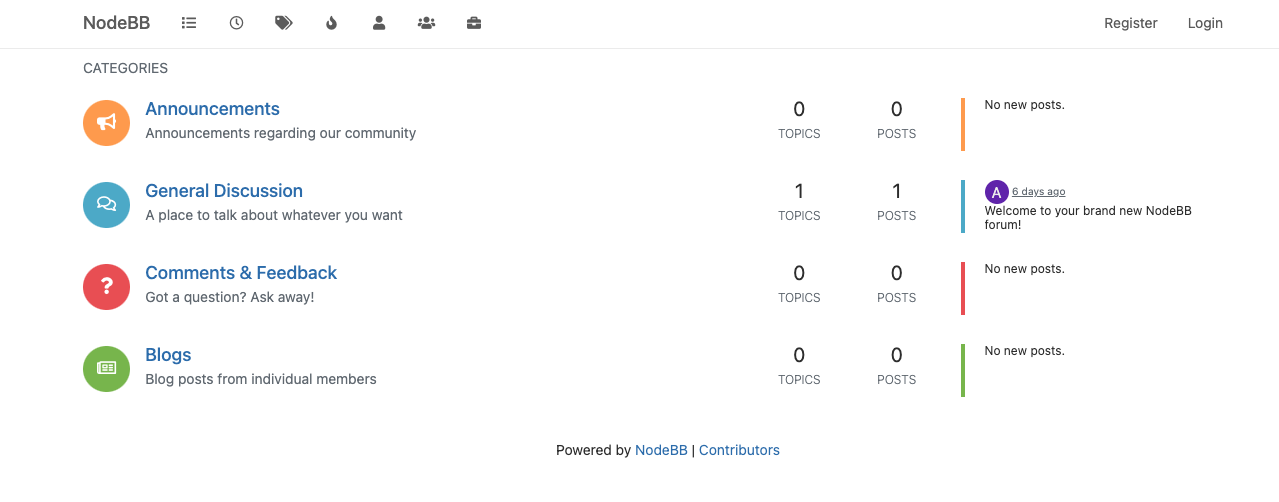
Once you have run NodeBB successfully, you should be able to navigate to http://localhost:4567 and see the main forum page. By default, NodeBB will be deployed to port 4567 on your machine. You may change this port number (e.g. to avoid conflict with another process running on your machine).
Warning
In this class, we do expect students to first try debugging errors on their own; this includes following stack traces, searching up error strings and unfamiliar outputs, etc. If you do get stuck, or if the process of installing and running NodeBB is taking you more than a few hours, stop and ask for help on Slack!
Take some time to click through the pages and explore the different features that NodeBB has to offer.
Analysis Tools
When working on an existing codebase, especially in a collaborative setting, we want to ensure that none of our changes introduce unexpected bugs or issues for other developers. To fulfill these goals, we often use different tools to help us evaluate our code. Luckily, NodeBB is already packaged with a number of neat tools!
Follow the Development Tools section in the repository README to run both the linter and testing tools provided by NodeBB on your computer. Without any changes to the repository, both tools should pass.
After the test suite finishes running, NodeBB will also generate a code coverage report. This report gives you measurements with regards to what percentage of the codebase is covered by the test suite. Open the index.html file in the coverage folder to see the full report.
Coverage Report (added 1/19/23)
As this is an existing codebase with a decently-sized test suite, you should expect to see a relatively high percentage of coverage, i.e. the majority of the bars/cells displayed should be green.
If you are seeing a lot of red bars, it may mean that the test suite was not run properly. Double-check that all of the tests passed and that there were no failures.
More on Analysis Tools
A linter is a tool that directly analyzes your source code for common errors. A test suite is a set of test cases that you write for a software program to show that it has some specified set of behaviors; our testing tool provides a framework to structure our test cases, runs the test suite, and generates a report of which tests pass/fail.
We will do a more in-depth exploration of analysis tools later in the course. For now, just know that these tools exist for you to use in evaluating your code.
Build Checkpoint (5 pts)
Upon completing the above steps, take screenshots of
- the home page of NodeBB, and
- the coverage report generated by the coverage tool
opened in your browser. Be sure the URL is clearly visible in both screenshots (i.e. localhost:4567 and the file path to your coverage file), so we can confirm that you have everything running locally.
Submit the two screenshots to Gradescope.
Onboarding
Now that you have explored the repository, the development team would like to give you an onboarding assignment.
Types types types! Driven by their programming language enthusiast, the team is currently undertaking a major code overhaul and converting the repository from JavaScript to TypeScript. This language is a superset of JavaScript and comes with many advantages, including better support for code editors, compile time error-checking and, of course, types!
As part of the efforts to integrate this new language into the repository, all future code will be written using TypeScript and the old files are translated as necessary. To prepare you for TypeScript development, the team would like you to contribute towards rewriting the codebase.
GitHub Issue (20 pts)
First, choose a single JavaScript file to translate and open a GitHub Issue in the class repository to declare which file you will be translating.
There are some restrictions on the .js file that you can pick. Specifically, the file must:
- Be in the
src/folder - Contain at least 50 lines of non-import statement code before you start translating it. Files like
src/api/index.jsandsrc/controllers/admin.jsare not allowed - Not be a file that someone else has already picked. We expect you to look through existing issues, if any, to avoid such duplication (thus, there is an incentive for you to start early!)
Title the task appropriately, such as Converting <file name> from JS to TS, and mention the file name in the description. To prevent ambiguities between similarly-named files, be sure to use the full file path (src/../xx.js) in the title and description.
Issue Guidelines
Issues titles should provide a high-level overview of what the problem is (e.g. "Navbar button UI bugs", "Unexpected registration validation errors"). Sometimes, issues are used to propose new features (e.g. "Add CSV export feature").
Issue descriptions should then elaborate on the title. For feature-level bugs, this may include providing information about how to reproduce the bug; for codebase-level changes, you can name specific files.
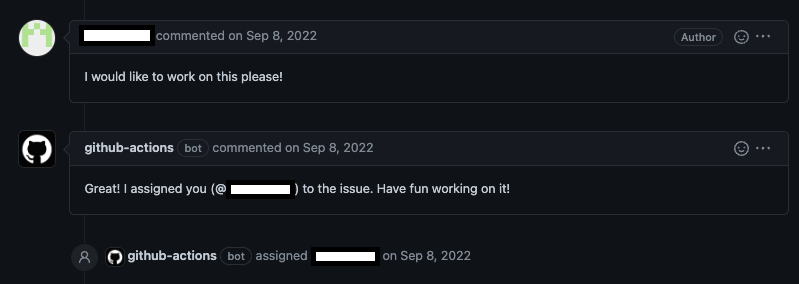
Then, assign yourself to the Issue by leaving a comment that says "I would like to work on this please!"
You should soon see another comment by the github-actions bot informing you that you have been successfully assigned to this issue.
Why Bot Assignment?
You might be curious as to why we are using a GitHub bot instead of directly assigning yourself to the issue. As you aren’t officially recognized as a collaborator of CMU-313/NodeBB, GitHub adds some restrictions to your permissions for security purposes, including not being able to assign yourself to an issue. Hence, we are using a bot to work around these restrictions. This is similar to how you would request issues on an Open Source project!
For future projects, you will have full control over these GitHub features such as managing assignees, adding labels, creating milestones, and more.
GitHub Pull Request (35 pts)
Back in your own fork, create a feature branch and implement the change. You should start with the following steps:
- Install TypeScript
- If you chose a file named
xx.js, create a new file calledxx.tsin the same directory - Copy over the contents of the original file into this new file
- Make changes to
xx.tsfile as needed to translate the file into TypeScript - Run
npx tscto generate a compiled JavaScript file from your changes
Your changes must still pass both the linter and the test suite, so be sure to test your changes locally!
Dependencies on Untranslated Files
There will be some instances where your file may reference functions or variables from modules in other files that have not been translated yet. This may cause the linter to throw errors as these values will be of type any. In those situations, and only in those situations, you may add the following comments to suppress the linter warnings:
// The next line calls a function in a module that has not been updated to TS yet
// eslint-disable-next-line @typescript-eslint/no-unsafe-member-access, @typescript-eslint/no-unsafe-call
We will check your files to make sure you are only suppressing these warnings when absolutely necessary. For examples and more details, see the Additional TypeScript Background section under "Resources and Documentation" below.
As you work, be sure to periodically commit your changes. Your commit message(s) must clearly describe what is changing. If you’d like, you can also make use of branching and pull requests in your own repository to practice working with GitHub.
Branch and Commit Guidelines
Branch names should be short and provide a description of what you will be doing on that branch (e.g. "fix-header-sizing-issue", "fix-multiple-dialog-bug", "add-sorting-feature"). When working with others, you can also append your username to signal which branches are yours (e.g. "313ta/add-sorting-feature").
Commits should start with a verb and provide a description of what they are doing to the codebase (e.g. "Remove faulty condition from getCustomerDetails", "Fix failing CompositeTestCase", "Fix issue #21" ).
Once you are satisfied, open a pull request from your personal branch back to the class repository. Similar to the Issue, your PR title should mention the full path of the file you’ve changed. The PR body should summarize the changes you made and use one of the linking keywords to link the issue that you previously opened (e.g. adding resolves #313 will signal to GitHub that this PR resolves issue number 313).
Pull Request Guidelines
Pull request titles should describe what high-level changes were made to the codebase. Generally, they give a concise summary of all the commit messages.
Pull request descriptions should describe what changes have been made in more detail and how the changes have been tested.
There will be automated checks that run on your pull request to ensure you meet the requirements of this assignment. Some of them take a while to run, so be sure to check on your pull request periodically to ensure that all these actions pass and everything is working properly!
Test Suite Failures
If the tests are failing on GitHub but work locally, it may be caused by server overload. Re-running the failing GitHub Action 1-2 times will resolve this.
If all of the actions have passed, you will see a green checkmark next to your pull request. This signals that you have completed the implementation aspect of this assignment! ✅
Written Assignment (40 pts)
After you have completed all of the above tasks, we will ask you some questions relevant to the NodeBB project and the course syllabus. Fill out and submit the HW1 Written Assignment available on Gradescope.
Grading
To receive full credit for this project, we expect:
- The correct usage of tools and technology, including Git, GitHub, and the repository-based tools
- A Gradescope submission of two screenshots showing a local running build of NodeBB and the coverage report within a browser
- A GitHub Issue with:
- A selected JavaScript file that follows our requirements above
- A meaningful title and description that includes the full path of the file
- A successful self-assignment as an assignee
- A GitHub Pull Request with:
- A meaningful title that includes the full path of the file
- A description body that describes the changes made and links the pull request to the issue
- Meaningful commit messages
- Appropriate usage of the eslint-ignore comment
- A green checkmark signaling that all checks have passed
- Answers to the Gradescope Written Assignment that demonstrate successful completion of the project and understanding of the benefits and limitations of software metrics in the context of NodeBB
Resources & Documentation
Below are some common resources to assist you with your completion of this project. If you get stuck, start by consulting the following materials; if you have any additional questions, the course staff will be available to answer questions via Slack and Office Hours.
Git & GitHub Documentation
Documentation for working with Git and GitHub:
We also have a simple Git-based exercise that you are highly recommeneded to complete before proceeding with this project.
TypeScript Documentation
The repository README contains links to different documentation material that you may find helpful in your development process. Particularly, you will want to focus on the documentation relating to JavaScript/TypeScript:
- TypeScript for New Programmers
- TypeScript for JavaScript Programmers
- JavaScript to TypeScript Translation
You will also find some sample translated TypeScript files within the repository. You can use these as guidance for your translation process:
Additional TypeScript Background
This section provides more context on how TypeScript is used for this project and when it is appropriate to suppress ESLint warnings in your translated TypeScript files.
As native JavaScript does not have any typing, by default, all functions/values/classes/modules that are not typed will be automatically given the any type by TypeScript. Under default settings, this allows any valid JavaScript code to be run as TypeScript.
Using the any type, however, will defeat the purpose of the various type-checking features TypeScript provides. As such, we’ve set our linter to check for strict typing and disallow the use of the any type. For the most part, this should check that you explicitly type everything within your files and ensure that you are able to make the most out of TypeScript.
A limitation of this strictness is that there will be errors thrown when using non-translated JavaScript imports, which TypeScript will assume to have type any. As an example from one of our sample translated files src/social.ts:
// A module import from a non-translated JavaScript file database/index.js
import db from './database';
…
const activated = await db.getSetMembers('social:posts.activated');
Running the linter will give the following errors:
error  Unsafe member access .getSetMembers on an `any` value
@typescript-eslint/no-unsafe-member-access

error  Unsafe call of an `any` typed value
@typescript-eslint/no-unsafe-call

error  Unsafe assignment of an `any` value
@typescript-eslint/no-unsafe-assignment
Let’s take a look at each error:
@typescript-eslint/no-unsafe-member-access- we don’t know the typing of our imported moduledb, so it is treated asany. However, we don’t know if something of typeanyhas a function calledgetSetMembers, hence this is an unsafe member access@typescript-eslint/no-unsafe-call- we don’t know the typing of the functiondb.getSetMembers, and so it is treated asany. We can not call a function of typeany, sodb.getSetMembers('social:posts.activated')is an unsafe call@typescript-eslint/no-unsafe-assignment- we don’t know the return type ofdb.getSetMembers, and so it is treated asany. We can not assign something of typeanyto our variableactivated
The first two errors are dependent on us knowing the typing of db and db.getSetMembers. However, because we haven’t translated the database/index.js file yet, we don’t have access to their typing information. In this case, it is okay to suppress the ESLint errors as they only arise from a lack of translation. We can do this by adding the following comments:
// The next line calls a function in a module that has not been updated to TS yet
// eslint-disable-next-line @typescript-eslint/no-unsafe-member-access, @typescript-eslint/no-unsafe-call
const activated = await db.getSetMembers('social:posts.activated');
For the last error, even though we don’t have typing information provided by the db module, we still want to make sure future uses of the activated variable get properly typechecked. Checking the rest of the file reveals that activated should be a string[] type; we can also manually cross-reference the db.getSetMembers function to check that this is the correct typing. Hence, it’s okay to cast the return value of this function call to string[], and our full solution looks like this:
// The next line calls a function in a module that has not been updated to TS yet
// eslint-disable-next-line @typescript-eslint/no-unsafe-member-access, @typescript-eslint/no-unsafe-call
const activated: string[] = await db.getSetMembers('social:posts.activated') as string[];
Installing Typing Packages
In some cases, if your file imports an npm package (such as lodash, nconf, etc), you will need to install the typings for the package. To do this, run:
% npm install @types/[packagename] --save-dev
You should then see the @types/[packagename] added to your package.json file.
GitHub Actions Packages
To make sure your GitHub Actions also install the correct packages, you should copy the package.json file to install/package.json.